dinsdag 30 april 2013

Runway Inspired: Baby Shower and Fusion #4

Ik wilde 3 challenges in een gaan doen. Dat is niet gelukt. Het werden er maar twee. Dat is ook niet erg, maar ik lig erg achter met de challenges. Met de schets van Fusion kun je ook heel goed een babykaartje maken. Dus dat heb ik gedaan. Alleen niet in de kleuren van de Nederlandse vlag. Dat werd me net te moeilijk.

Eerst de achtergrond heel licht gesponst met roze. Daarna (met dank aan Margriet) de grote bloem laag voor laag gesponst. Vastgezet en bedacht dat er een eendje op moest. Die gestempeld, uitgeknipt en opgeplakt. Er moest nog wat bij voor de schets. Dus ik een vlinder uit geponst, licht gesponst en met glitter opgeplakt op de bloem. Het sentiment gestempeld en de bolletjes langs de rand gesponst door een mal. Bloem er op en klaar!


I wanted to combine three challenges in one. That's not what I made in the end. It's not a to bad, but I'm quite behind with my challenges. So with the sketch from Fusion you can make a good babycard. So that's what I ended up making. It wasn't in the colours of the Dutch flag. That was one step to far for me today.

First I sponged the background very light with pink. Than (with thanks to Margriet) I sponged the big flower layer for layer. I put the flower together and it needed a little duck in the middle. So I stamped one, cut it out and glued it on the middle of the flower.  The sketch showed somthing else and I punched out a butterfly, sponged it lightly and glued it on the flower. Stamped the sentiment and sponged the dots with a mall. Flower on the card and finished!


Paper: from work and unknown
Ink: Stampin' Up Crumb Cake, Pretty in Pink, Pink Pirouette and Poppy Parade
Stamps: Stampin' Up Spring Sampler
Punches: Unknown
Challenges: Runway Inspired: Baby Shower and Fusion Card Challenge #4

maandag 29 april 2013

LiM week 117: Sketch #9

De opdracht deze week, werk naar voorbeeld van de schets. Daar was ik behoorlijk traag mee, omdat ik ziek werd, en mijn inspiratie er vandoor was gegaan. Nu ben ik nog steeds niet beter, maar ik wilde wel graag mijn originele idee uitvoeren waar ik voor dat ik ziek werd aan begonnen was. Gelukkig niet heel ernstig ziek, gewoon snip verkouden. Verder ben ik aan het experimenteren met kaarten anders dan gewoon dubbel. Voor nu heb ik de tutorial van Splitcoast Stampers gebruikt. Het is weer eens wat anders.

Een dag eerder heb ik al het kikkertje op aquarelpapier gestempeld met StazOn. Daarna dus de tutorial volgen om de basiskaart te maken. Het kikkertje met ingekleurd en op maat gemaakt om in het midden te passen. Het sentiment gestempeld en deze uit geponst. Sneetjes aan de zijkanten gemaakt en het lint er doorheen gehaald. Dit op de kikker geplakt en vervolgens de kikker in de kaart geplakt.


This weeks challenge was to make a card after this sketch. I was pretty slow because I fell ill and took my inspiration away. I'm not totally cured, but I wanted to make my original idea anyway before I fell ill. It's not that tragic, just a cold. A was expirimanting with cards other than just folded in half and for now I used a tutorial from Splitcoast Stampers. It's something different.

A day before I stamped a frog on aquarelpaper with StazOn. After that I followed the tutorial to make a basic card. I coloured the frog and made it fitting for it's place on the card. Stamped the sentiment and punched it out. Fir the ribbon I made small cuts in the side of the punched out sentiment and pulled the ribbon through. Glued the sentiment with the ribbon onto the frog and than the frog on the card.


Paper: Aquarelpaper, Stampin' Up Lucky Limeade
Ink: StazOn, Stampin' Up Lucky Limaede, Elegant Eggplant, Riding Hood Red, Peach Parfait
Stamps: Stampin' Up Teeny Tiny Sentiments, Country Companions
Ribbon: Action
Punch: Stampin' Up Word Window
Tutorial: Splitcoast Stampers: Levercard
Challenge: Less is More week 117: Sketch #9

donderdag 25 april 2013

Totaly Tess

Voor m'n schoonmoeder een kaartje gemaakt, met dingen die je allemaal met de Cuttlebug kan doen. Was heel erg leuk om er iets moois van te maken.

Eerst het mandje gestempeld, en dat gemaskerd, en vervolgens Tess er overheen gestempeld. Dit bleek niet zo mooi als ik had gedacht. Dus dit maar omgedraaid. Stond veel leuker! Dit doe ik altijd een aantal keer, zodat ik het mooiste plaatje er tussenuit kan halen. Deze met aquarelpotloden in gekleurd, en halverwege bedacht ik dat het niet zo mooi was. Dus nog een meisje in gekleurd en deze over de andere heen geplakt. Dat was beter. Dan staat daar een leuk meisje met mandje vol bloemen op een vel papier, maar wat doe je er dan mee?

Met een framelit deze mooi uit het vel papier gehaald en die wilde ik op een groen papier plakken... Saaaaaai! Dus uit de kaart met een framelit en de cuttlebug maar een kader gemaakt, en daar wilde ik het meisje achter plakken. Eerst nog even de voorkant van de kaart door een embossingfolder en de cuttlebug gehaald, voor ik wel het meisje er achter plakte. De kaart was wel een beetje saai, en miste nog een sentiment. Deze gestempeld en ook met een framelit uit gestanst. Daar twee sneetjes in gemaakt, zodat deze met een leuk lintje op de kaart kon. En klaar is ie! Eigenlijk zonde om op te sturen..


I made a card formy mother in law to show what you can do with the Cuttlebug. It was fun to make somthing nice with it.

I first stamped the basket and masked it to stamp Tess. This was not the effect what i wanted, so I turned the stamping order around. That was better! I will stamp alway more than one image so I can pick the best. I coloured it with aquarelpencils to see that it was not how I wanted it done. So I coloured another one and glued it over the first one. That was better. Than you have a nice girl with a basket full of flowers on your paper, so what next?

I punched the girl out with a framelit because I wanted to glue that on a piece of green cardstock... Boring! So I cut a frame out of green cardstock and after embossing it, glued Tess behind it. The card was a little of, so it needed a sentiment. Stamped the sentiment and made two small cuts to get a ribbon behind the sentiment and onto the card. Finished!! Actually a shame to send it away....


Paper: Action and Stampin' Up
Ink: Stampin' Up
Stamps: Stampin' Up Totally Tess and Action
Pencils: Bruynzeel
Ribbon: Action
Framelits: Sissix Oval Scallop and Oval
Embossingfolder: Sissix flowers

ColourQ Challenge #186 en CASology week #41: Giggle

Deze doe ik geloof ik maar vaker samen. Ze sluiten wat mij betreft heel erg bij elkaar aan. Het idee was er niet zomaar. Voor de kleuren van ColourQ ben ik maar weer naar mijn held Marrigje Barnard gerend. Post krijgen is vaak ook leuk. Daarom deze ook bij Giggle van CASology.

Eerst de bloemetjes van de kleine kaart een kleurtje gegeven. Envelopje gevouwen en de kaart een kleurtje gegeven. Brievenbus getekend en gesponst. Teksten geschreven en de kleine bloemetjes op de kaart geplakt. Bloemblaadjes er bij getekend. De pijlen op de kaart gezet en envelop en kaartje opgeplakt.

Deze keer ging het niet soepel. Die bloemetjes wel 5x over gedaan. Wat was dat lastig. Was ik ze weer kwijt of niet goed op het kaartje geplakt. Kleine envelopjes vouwen is geloof ik ook niet mijn ding. Was ik net klaar ging mijn jongste er ook nog eens vandoor met mijn net gevouwen envelopje en kon ik dus nog een keer. Overal maskertape omdat hij de rol te pakken kreeg. Hij vindt plakband echt geweldig. Alles vastplakken..... en mama helpen.... Heel gelukkig werd mama er van....


I think I will combine these two challenges more often. They work good together for me. The idea wasn't there at once. For the ColourQ colours I ran to my hero Marrigje again. And getting mail is fun (most of the time..). That's why by Giggle from CASology too.

First I coloured the small flowers. Folded the envelopeand coloured the little card. Drew a mailbox and sponged it. I wrote the sentiments and glued the small flowers on the little card. Drew the leaves by the flowers. I drew the arrows and glued the envelope and the little card on the card.

It didn't go easy this time. I did the flowers for at least 5 times. That was a tricky thing. I lost them or glued tham not right on the card. And folding small envelopes is not my thing I believe. Did I finish one, grabbed my jongest it and ran away with it. And than I had to do it again. Masking tape everywhere because he loves tape. Taping averthing together.... and helping mommy... O what was I happy.....


Paper: from work and wrapping paper from Stampin' Up
Ink: Stampin' Up Lucky Limeade, Melon Mambo and Pumpkin Pie
Challenges: ColourQ Challenge #186 and CASology week #41: Giggle

woensdag 24 april 2013

Muse Challenge #14

Van deze kleuren wordt ik vrolijk. Meteen wilde ik wat anders dan alleen maar bloemen.

Een tijd geleden heb ik al de afbeelding van het meisje op het strand gestempeld op aquarel papier. Deze dus is mooie kleuren ingekleurd met inkt en waterpenseel. Daarna het sentiment gestempeld en met een lint over de kaart geplakt.


Those colours make me happy. I wanted to do something else instead of flowers.

A long time a go did I stamp this girl on the beach on aquarel paper. I coloured it with ink and waterbrush. Stamped the sentiment and fastened it on the card with some ribbon.


Paper: Aquarel paper and Stampin' Up Cherry Cobbler
Ink: Stampin' Up Cherry Cobbler, Midnight Muse, Gumball Green, So Safron
Pensils: Bruynzeel aquarel
Stamps: Stampin' Up
Challenge: Muse Challenge #14

Runway Inspired Challenge #34: Reem Acra

Ik kwam per ongelijk op deze challenge. Ik zag het en had een idee. Ik weet niet of ik hier vaker aan mee ga doen maar ze zijn wel leuk.


Als eerste heb ik geprobeerd om te heat embossen met zwart. Dat werd helemaal niks. Toen bedacht ik dat ik vroeger vaak hele kleine bloemetjes tekende met lange bloemenranken. Perfect! Dus ik maar weer aan het tekenen met zwarte pen op een witte kaart. Met rood een sentiment op vellum gestempeld en die als banner uitgesneden.


I came by this challenge accidentally. I saw it and had an idea. I don't know if I will participate here more often, but I like them.

First I wanted to heat emboss flowers in black. But it turned out not so good as I wanted. Than I thought about how I did draw tiny flowers with long stems. Perfect! So I started drawing with black on white cardstock. I stamped the sentiment in red on vellum and cut is as a banner.


Paper: from work Pop'Set Black
Vellum: Action
Ink: Stampin' Up Riding Hood Red
Stamp: Stampin' Up Vintage Verses
Challenge: Runway Inspired Challenge #34


maandag 22 april 2013

Fusion Card Challenge #3

Deze week weet ik niet waar ik mijn inspiratie vandaan heb gehaald. Ik zag de challenge en had een pracht idee in mijn hoofd, maar niet de stempels. Dan ren ik dus altijd heeeeeeel hard naar Marrigje. Eenmaal daar kwam ik op een nog beter idee. Daarvan is mijn kaartje het resultaat.

De onderkant gemaskerd zodat ik da kon sponzen met Pink Pirouette. Masker verwijderd en met Blushing Bride de kersenbloesemtak gestempeld. Op een ander vel papier de grote bloem met Cherry Cobbler heat embossed. Deze bloem uitgeknipt eerst het sentiment gestempeld voor ik de grote bloem met 3D foam heb opgeplakt. Alles op een Blushing Bride kaart geplakt en klaar is het.


I don't know where my inspirationf for this week came from. I saw the challenge and had a fabulous idee. But I missed the stampset I wanted to use, so in that case I always run to Marrigje. When I came there, I had an even beter idea. This card is the result.

I masked the card so I could sponge the bottom in Pink Pirouette. E removed the masking and stamped the cherryblossom in Blushing Bride. With heat embossing I made the big flower in Cherry Cobbler. I cut out the flower and before I glued it on the card, I did stamped the sentiment. I glued the whole card on Blushing Bride cardstock an finished I was.

Paper: from work and Stampin' Up Blushing Bride
Ink: Stampin' Up Pink Pirouette, Blushing Bride and Basic Black
Embossing powder: Stampin' Up Blushing Bride
Stampset: Stampin' Up Eastern Blooms (with thanks to Marrigje Barnard) and Country Companions
Challenge: Fusion card challenge #3

zondag 21 april 2013

LiM week 116: CASe it

Dit vergde enig nadenken. De opdracht was om van twee kaarten je ivoorbeeld te halen. Dat is redelijk gelukt. Ik had al een moederdagkaart gemaakt, en nu dus ook maar een voor vaderdag.

Als eerste de bloem in tweevoud gestempeld. Daarna met de nodige moeite de letters uit de bloem gehaald, zodat ze op de ander konden worden geplakt. Dat gedaan met 3D foam tape en een wit lintje er onder geplakt. Van de witte kaart de randen gesponst en de kaart met letters er opgeplakt. Eigenlijk heel simpel, maar de uitvoering vergde nogal wat doorzettingsvermogen...

Voorbeeldkaart
Voorbeeldkaart
 
This challenge took some thinking. The challenge was to use the two cards for examples. I think it worked out well for me. I already made a mothersday card, and now one for fathersday.

At first I stamped the flower twice. With some difficulty I got the letters out of the flower so I could glue them on the other flower with some 3D foam. I glued a white ribbon under the word. The edges of the white card I sponged and than glued the card with letters on the white, sponged card. It looks very simple, but the execution took some willpower.....


Paper: from work and Stampin' Up Pool Party
Ink: Stampin' Up Crumbcake
Stamp: Betsy's Blossoms
Dies: Typeset Alphabet Sissix Bigz
Ribbon: Action
Challenge: Simply less is more week 116: CASe It

zaterdag 20 april 2013

SU-per challenge #5: Schets en CAS-ual Fridays #99: Birthday Bash

Schets SU-per challenge
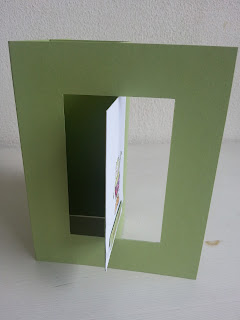
Voor de SU-per challenge was de opdracht Schets. Ik vond een gewone kaart zo saai, dus heb er een aanpassing in gemaakt.

Eerst het kaartkarton gestempeld met een strook vliegers. Daarna een Windowframe uit gestanst met de Cuttlebug en daar het muisje op gestempeld. De randen gesponst en er gaatjes in de rand langs geprikt. Vervolgens het muisje gekleurd en opgeplakt. De ene helft van het frame losgesneden van het kaartkarton en de rillijnen aangebracht. Kaart gevouwen. De vier uit gestanst en dit over de insnede geplakt om die weg te laten vallen. De vier gesponst. Sentiment gestempeld en die uit geponst en opgeplakt.


For this SU-per challenge you needed to use the sketch. I found a normal card to normal, so I decided to make a little alteration.

First I stamped a strip of kites om the cardstock. After that I punched out a windowframe with the Cuttlebug and stamped the mouse on it. I sponged the edges an pierced it. I gave the mouse some colour and glued it on the cardstock. I cut one half or the frame loose from the cardstock and rilled it. I folded the card and punched out the four to cover up the incission. I sponged the four and stamped the sentiment and glued it on the card.


Paper: Stampin' Up Peach Parfait
Ink: Stampin' Up Peach Parfait and Basic Black
Stamps: Country Companions and Stampin' Up Teeny Tiny Sentiments and Spring Samplers
Dies: Stampin' Up Window Framelits and Typeset Alphabet Bigz
Punches" Stampin' Up Word Window
Paperpiercing: Stampin' Up Festive
Pencils: Bruynzeel
Challenges: CAS-ual Fridays #99: Birthday Bashes and SUper challenges #5: Schets

vrijdag 19 april 2013

LiM week 115: one Layer Film

Dit kaartje zat in mijn hoofd en moest gemaakt worden. De challenge was one layer film. De film is Spring, summer, fall, winter and spring van Kim Ki Duk. Ik vind het een prachtige film die je gezien moet hebben.

Ik heb op een lange strook papier de vier jaargetijden gestempeld. De lente heb ik expres twee keer gedaan. Vervolgens ingekleurd met potlood.


This card was in my head and had to be made. The challenge was one layer film. The film I choose is Spring, summer, fall, winter and spring. It's a wonderfull movie you should watch.

In a long strip of cardstock I stamped the four seasons. I stamped spring twice on purpose. With pencils I gave it some colour.


Cardstock: from work
Ink: Stampin' Up Island Indigo, Riding Hood Red, Gumball Green and Early Espresso
Stamps: A Flower for all Seasons (my hero Marrigje Barnard again!)
Pencils: Bruynzeel
Challenge: Simply less is more week 115: One Layer Film

donderdag 18 april 2013

ColourQ Challenge #185

Twee van de vijf kleuren heb ik niet, dus moest weer even langs mijn held. Ik wist nog niet wat ik ging maken. Ik had vandaag een drukke dag. Twee gesprekken voor wat leuks en de orthodontist met mijn oudste.

Ik heb nog een stempelsetje die ik nog niet gebruikt heb. Daar ging ik maar wat mee doen. Eerst een balk afgeplakt om de bloemen te stempelen. De bloemen in Bermuda Bay, Melon Mambo en Poppy Parade gestempeld op een witte kaart. Op een ander stuk cardstock de broek gestempeld in Concorde Crush. Deze over gestempeld in Versamark en met clear embossing een reliëf gegeven.

Met een framelit de broek uit geponst. Met een inktpen langs de rand om die te accentueren. Een lintje geknoopt aan de bovenkant van de bloemenband. De broek met 3D foam er op geplakten het geheel op Concord Crush cardstock bevestigd.


I'm missing two of the five colours, so I had to visit my hero. I didn't know what to make yet. I had a very busy day with two meetings about something fun and the orthodontist with my eldest.

I have a still unused stampset. I had to do something with it. Firtst I maske of a strip of cardstock to stamp a line of flowers in Bermuda Bay, Melon Mambo and Poppy Parade. On another piece of cardstock I stamped the trousers in Concord Crush. I stampedit over with versamark and clear embossing to give it more reliëf.

With a framelit I punched out the trousers. I used an inkpen to give the edges some colour and knotted a ribbon over the flowerstrip. The trousers I glued on the card with some 3D foam and than fastened the whole on Concord Crush cardstock.


Cardstock: from work and Stampin' Up Concord Crush
Ink: Stampin' Up Concord Crush, Melon Mambo, Bermua Bay, Poppy Parade and versamark (thanks to Marrigje Barnard, my hero)
Stamps: Stampin' Up Madison avenue and Patterned Occasions
Framelit: Sissix Tickets Framelits
Ribbon: Action
Embossing Powder: Artemio Clear
Challenge: ColourQ Challenge #185


dinsdag 16 april 2013

CASology week 40: Word and Muse Challenge #13

         
Woorden/Letters gebruiken op kaarten, lastig. Mooi te combineren met de challenge van Muse. De rechterkaart is de inspiratiekaart van Muse. Aangezien het straks weer moederdag is, maar een moederdagkaart gemaakt om te geven.

De letters uit glitterfoam gehaald. Een ovaal uit gestanst en de binnen ovaal gebruikt om er omheen te sponzen. Het sentiment gestempeld en de letters er boven geplakt. Prachtige CAS kaart en met de inspiratie van de Muse challenge.


Words using on a card, difficult. Nice to combine with the Muse challenge. The top right card is the inspiration card from Muse. And because it's gone be mothersday soon, I made a card to give to her.

I punched the letters out of glitter foam. Punched out an oval and used the middle to sponge around it. I stamped the sentiment and glued the letters above it. A beautiful CAS card with Muse inspiration.


Paper: Buhrmann Ubbens So...Wool Ivory Fleece
Foam: Action
Ink: Tim Holz Distress Ink and Stampin' Up Basic Black
Stamp: Stampin' Up Vintage Verses
Dies: Sissix Ovals and Stampin' Up Sissix Bigz Alphabet Typeset
Challenges: CASology week 40: Word and Muse Challenge #13

maandag 15 april 2013

LiM One layer week 115: Film and Crazy for CAS Challenge #16: Sketch

Crazy for CAS sketch
Weer twee challenges in een. De LiM is one layer van een film en de Crazy for CAS is een sketch. Goed te combineren op zich. Als het dan ook wil zoals je hebt gepland. Ik heb het in totaal wel 9x over gedaan. Elke keer weer anders.

Het eindresultaat mag er wezen. De film die ik koos is Labyrinth. Ik vind het nog steeds een mooie film.

Ik ben begonnen met het muurtje te stempelen in zwart. Deze gemaskerd en het doolhof er over gestempeld. Sentiment er vrij strak onder en goed laten drogen. Vervolgens ingekleurd met potlood.


Two challenges combined again. This weeks LiM is one layer movie and the Crazy for CAS is a sketch. Good to combine if you have an idea. It didn't work out exactly as I wished, so I tried it at least 9 times. Every time a different way.

The result is good. The movie I choose is Labyrinth. I still like the movie.

I started by stamping the brick wall in black. I masked it and stamped the maze over it. I stamped the sentiment very close to the wall and let the ink dry. Than took my pensils and coloured the wall.


Paper: from work
Stamp: Unknown and Stampi' Up Totally A-maze-ing
Ink: Stampin' Up Basic Black
Pencils: Bruynzeel
Challenges: Simply less is more one-layer week 115: Film and Crazy for CAS challenge #16: Sketch