Elke maandagavond is het tijd voor workshop bij Wad Creatief van Marrigje Barnard. Zij is gek op technieken en daarom hebben we een weinig gebruikte techniek gedaan. Deze komt van Technique Junkies en was in eerste instantie bedoeld om met knopen te doen in plaats van vlinders. Je kan dit met verschillende embellishments doen, als ze maar hoog genoeg zijn.
 |
| Kaart 1/card 1 |
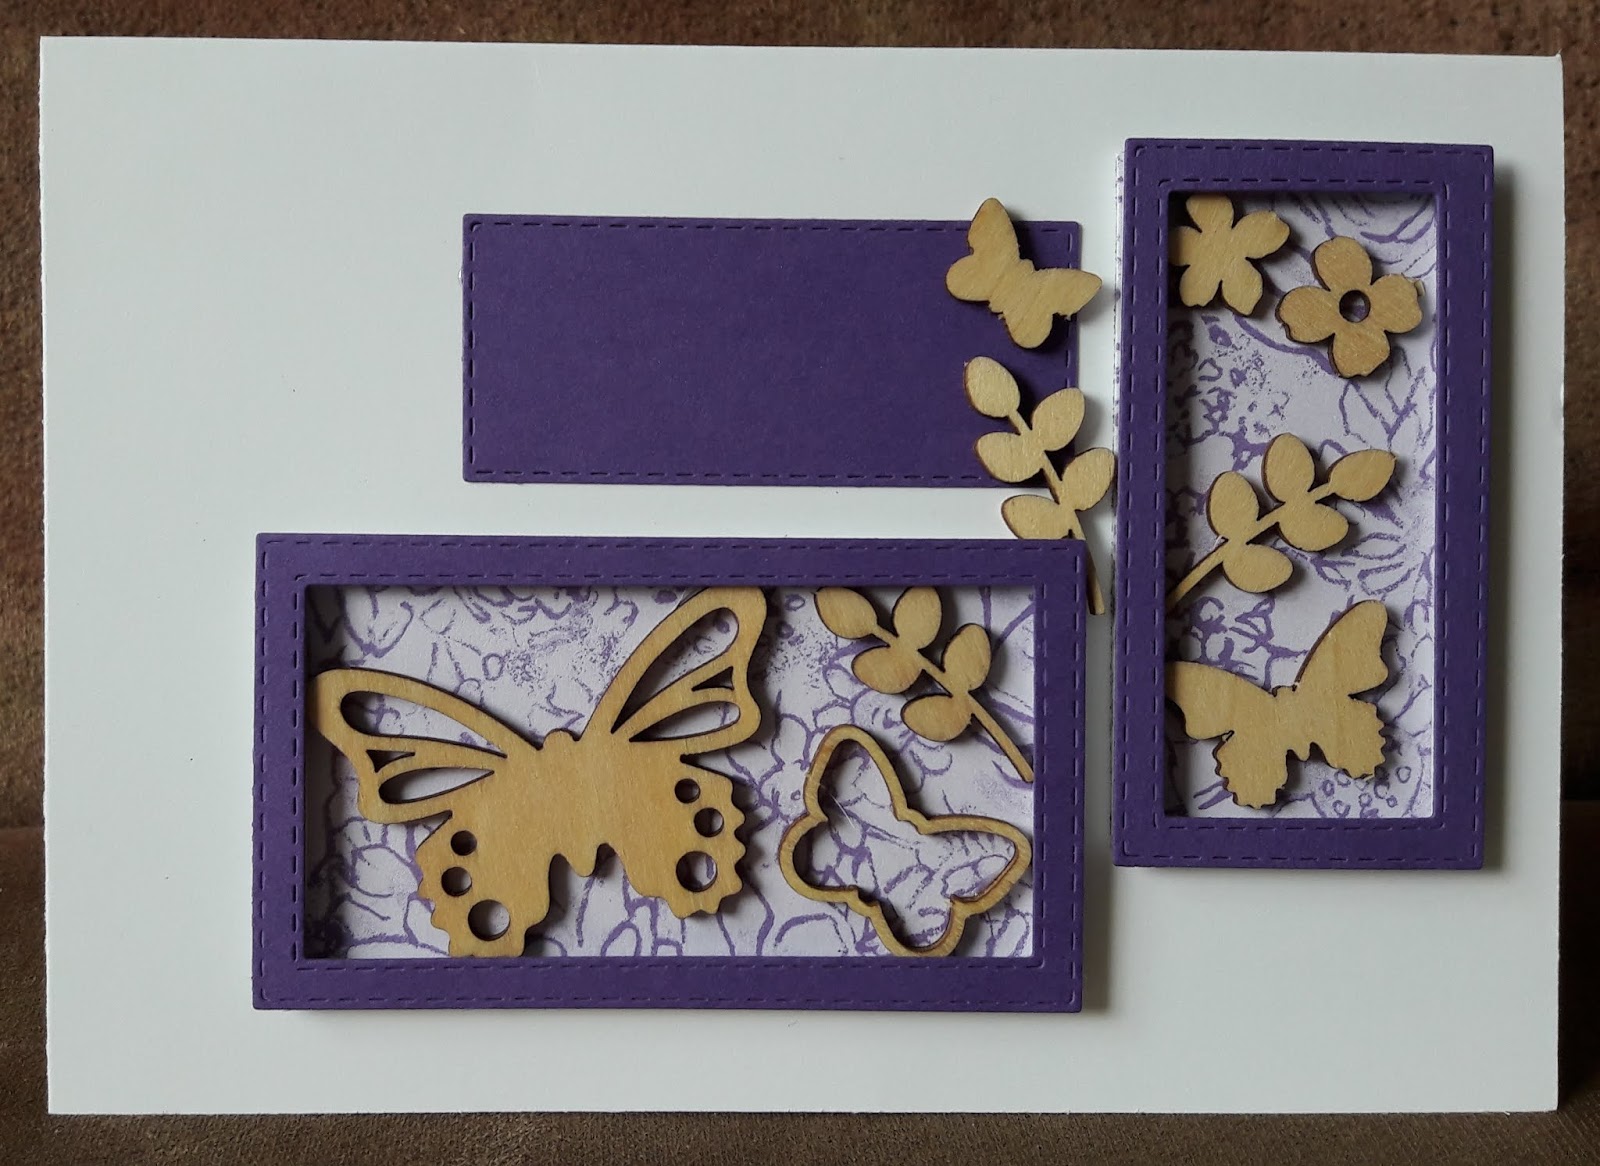
Voor de eerste twee kaarten hebben we eerst de frames uit gestanst met de Big Shot in verschillende kleuren. Gebruik 2 stansen verschillend in grote om een frame te krijgen. Bewaar de binnenkanten van de frames om later te kunnen gebruiken als tags. Leg de frames op je kaart naar wens en plak ze vast met lijm. Stans daarna een frame uit foil sheet om die er uit te laten springen. Voor de foil frame een achtergrond op maat maken en deze met foam strips achter het frame plakken. De achtergrond van een frame een millimeter kleiner dan de buitenmaten van het frame maken. De vlinders er in rangschikken en deze vastplakken met de lijm. Dit geheel op je kaart plakken. Kaart 1 klaar. Op naar kaart 2.
Kaart 2 gebruiken we de frames die we eerder hebben uit gestanst. We kiezen er twee en een binnenkant van een frame. Wij hebben dezelfde kleuren voor deze kaart gebruik om het meer een geheel te maken. Passend achtergrond papier op maat snijden voor achter de 2 frames. Maak deze weer een millimeter kleiner dan de buitenmaat van je frames. Deze twee achtergronden weer achter de frames plakken met foam strips en opvullen met vlinders. Niet zo veel als bij de eerste kaart omdat je bij deze ook het achtergrondpapier nog wilt zien. Rangschik de twee frames en het label op je kaart. Plak de frames vast en stempel een tekst op je label. Dit heb ik nog niet gedaan omdat ik nog niet weet voor welke gelegenheid mijn kaart wordt. Plak het label vast en ik heb er nog een vlinder en takje buiten de frames op geplakt. Kaart 2 klaar, tijd voor kaart 3.
 |
| Kaart 3/card3 |
On Monday evening it's time for a workshop by Marrigje Barnard from Wad Creatief. She's a technique addict and we did a not often used technique from Technique Junkies and was ment to be done with buttons instead of the butterflies we used. You can use this technique with different kind of embellishments if they are high enough.
Tonight we used the butterflies and designer paper from the Sale-a-Bration 2019. Three cards with the same technique but different to see.
For the first two cards die cut frames by using two seizes of framelits at ones with the Bighot. We made several in different colours and kept the insides as labels for later on. Lay the frames in different seizes on your card in your composition and glue them. Make a foil sheet frame to let this one stand out. Cut out a background for the foil frame 1 millimeter smaller than the outside from the frame. Glue it to the back of your foil frame with the foam strips. Fill it up with butterflies and flowers and glue them. Card 1 done, time for card 2.
 |
| Kaart 2/card 2 |
For card 2 we use the frames made earlier on and pick two in the same colour and one label in the same colour. Make two backgrounds from the designer paper for the two frames 1 millimeter smaller than the outline of the frames. Glue them with foam strips to the frames and use butterflies to fill them. Not to much because you want to see the background also. Make your composition with the two filled frames and label on your card and glue the two frames. Stamp a sentiment on your label before you glue it on your card. I didn't because I don't know for what occasion I want to use it. I glued another butterfly and flower outside the frames but in essence your card is done. So time for card 3.
For card 3 we take a front that is half a centimeter smaller than the front of your card. We die cut a rectangle out of it to look like a dia or polaroid photo. Use a very thin line of pencil to map out where your frame is on your card so we can stamp the background. Stamp the background not to close to the edge of the card, otherwise it will de visible on the edge. Stamp your sentiment on the frame because when it's glued, stamping on it will be difficult. Put the foam strips on the inside edge of the frame and use demensionals to solidify the frame more. Use two of them on top of each other otherwise it won't be as high as the foam strip. glue it on the card and arrange the butterflies and flowers on the inside of your frame. Not so much because you still want to see the background.
Papier: Stampin' Up! Whisper White 3x A5, Botanical Butterfly Designer Series Paper (Sale-a-Bration 2019), Grapefruit Grove & Lovely Lipstick Foil Sheets (Sale-a-Bration 2019) en andere kleuren.
Framelits: Stampin' Up! Rectangle Stitched Framelits Dies
Inkt: Stampin' Up! Pacific Point, Garden Green, Night of Navy,
Stempels: Stampin' Up! Painted Harvest
Embellishments: Stampin' Up! Butterfly Elements (Sale-a-Bration 2019)
Lijm/glue: Stampin' Up! Foam Adhesive Strips, Multipurpose Liquid Glue en Stampin' Dimensionals
Met dank aan/ with a lot of thanks to: Wad Creatief, Technique Junkies
Geen opmerkingen:
Een reactie posten