woensdag 20 februari 2019

Less is More Challenge 389 One Layer focus on Sentiment

English below

Na een korte stilte weer een blog van mij. Dit wordt de enige deze week omdat ik met mijn oudste open dagen ga bezoeken voor haar opleiding. Ze wil naar Hogeschool Maastricht en naar de Universiteit Leiden. 

Over deze opdracht heb ik na moeten denken. Ik wist al vrij snel dat ik wilde embossen. Simpel en heel snel met een tekst er bij. De bolletjes met Wink of Stella nog wat glitter gegeven.

After a short silence another blog from me. It will de the only one this week. I will be visiting universities with my oldest so no time to blog than. 

I had to think about this challenge. I knew that I wanted to emboss.Just a sentiment and done. Did some glitter on the flower with Wink of Stella and done. 

Challenge: Less is More
Papier/paper: Stampin' Up 
Inkt/ink: Stampin' Up Call me Clover and Wink of Stella
Stempels/stamps: Stampin' Up Butterfly Basics
Embossing folder: onbekend/unknown

donderdag 14 februari 2019

Less is More 2 februari 2019

English below

Het is alweer een hele tijd geleden dat ik mee deed met deze challenge. Nu ik weer begonnen ben met bloggen, ga ik ook gewoon maar weer mee doen met deze challenge. De opdracht was Navy en geel.

Ik bedacht dat een gele of blauwe achtergrond. Verder ben ik in mijn stempels gedoken en kwam een oude set tegen waarvan ik er een heel toepasselijk vond voor de sterren die ik tussen de framelits eigenlijk alweer vergeten was dat ik ze had. Hier maar een mooi kraamkaartje van gemaakt. De kleine sterren laten glimmen met Wink of Stella. Dit is helaas op de foto niet goed te zien.

It's been awhile that I joined this challenge. Now I'm blogging again and thought that it would be good to start again. The challenge is Navy and yellow.

I was planning on using a yellow or blue base card. I took a dive in my stamps to search for a nice set and came across this set in combination with the stars framelits I forgot I had. So made this baby card with the stars. I used Wink of Stella to let the smaller stars glitter a little bit. Sadly you can't see this on the picture. 


Papier: oude voorraad
Stempels: Stampin' Up! Cuddles & Kisses
Inkt: Stampin' Up! Blueberry Bushel en Wink of Stella
Framelits: Stampin' Up! Stars Framelits
Challenge: Simply Less is More

dinsdag 12 februari 2019

Workshop maandag 11 februari 2019

English below

Elke maandagavond is het tijd voor workshop bij Wad Creatief van Marrigje Barnard. Zij is gek op technieken en daarom hebben we een weinig gebruikte techniek gedaan. Deze komt van Technique Junkies en was in eerste instantie bedoeld om met knopen te doen in plaats van vlinders. Je kan dit met verschillende embellishments doen, als ze maar hoog genoeg zijn.

Kaart 1/card 1
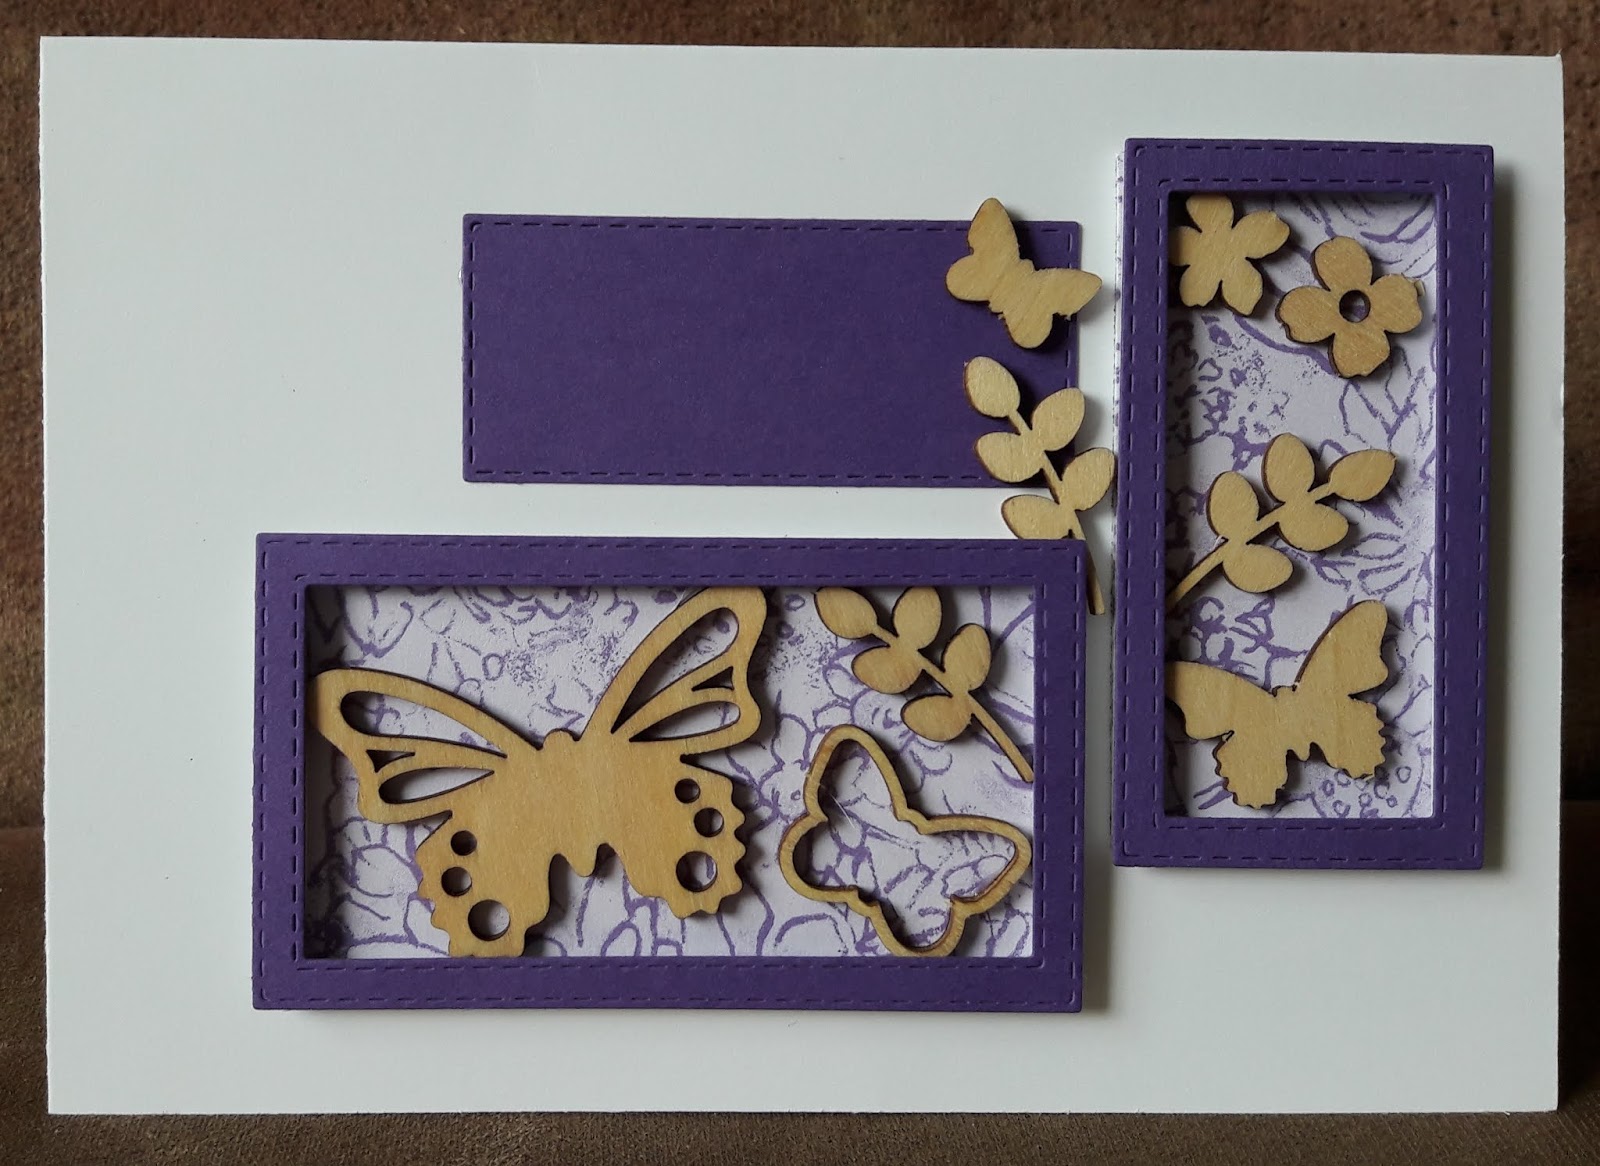
Vanavond hebben we met vlinders gewerkt die uit de Sale-a-Bration 2019 komen. Ook het achtergrondpapier komt uit de Sale-a-Bration 2019. Drie kaarten met eenzelfde soort techniek die er alle drie totaal verschillend uit zien.

Voor de eerste twee kaarten hebben we eerst de frames uit gestanst met de Big Shot in verschillende kleuren. Gebruik 2 stansen verschillend in grote om een frame te krijgen. Bewaar de binnenkanten van de frames om later te kunnen gebruiken als tags. Leg de frames op je kaart naar wens en plak ze vast met lijm. Stans daarna een frame uit foil sheet om die er uit te laten springen. Voor de foil frame een achtergrond op maat maken en deze met foam strips achter het frame plakken. De achtergrond van een frame een millimeter kleiner dan de buitenmaten van het frame maken.  De vlinders er in rangschikken en deze vastplakken met de lijm. Dit geheel op je kaart plakken. Kaart 1 klaar. Op naar kaart 2.

Kaart 2 gebruiken we de frames die we eerder hebben uit gestanst. We kiezen er twee en een binnenkant van een frame. Wij hebben dezelfde kleuren voor deze kaart gebruik om het meer een geheel te maken. Passend achtergrond papier op maat snijden voor achter de 2 frames. Maak deze weer een millimeter kleiner dan de buitenmaat van je frames. Deze twee achtergronden weer achter de frames plakken met foam strips en opvullen met vlinders. Niet zo veel als bij de eerste kaart omdat je bij deze ook het achtergrondpapier nog wilt zien. Rangschik de twee frames en het label op je kaart. Plak de frames vast en stempel een tekst op je label. Dit heb ik nog niet gedaan omdat ik nog niet weet voor welke gelegenheid mijn kaart wordt. Plak het label vast en ik heb er nog een vlinder en takje buiten de frames op geplakt. Kaart 2 klaar, tijd voor kaart 3.

Kaart 3/card3
Voor kaart 3 nemen we een gekleurd front dat een halve centimeter kleiner is dan de voorkant van je kaart en stansen daar een rechthoek uit. We doen dit op de manier zodat dit op een dia of polaroid foto lijkt. Geef met een potlood aan waar je frame komt op je kaart zodat we daarbinnen kunnen stempelen. Omdat we een whisper white basiskaart gebruiken en lichte embellishments kun je het beste stempelen met donkere kleuren. Zorg ervoor met stempelen dat je niet te dicht op de kaartrand stempelt omdat dit dan te zien is. Stempel eventueel alvast een sentiment of tekst op je frame want als deze is vastgeplakt, wordt dit een stuk lastiger. Plak langs de binnenrand van je frame foam strip en verstevig de rest met demensionals. Hiervan moet je er 2 op elkaar plakken omdat de foam strips 2x zo hoog zijn. plak het frame op de voorkant van je kaart en plak hier weer vlinders in. Hoeft ook niet vol omdat ook bij deze je de achtergrond nog wilt zien.

On Monday evening it's time for a workshop by Marrigje Barnard from Wad Creatief. She's a technique addict and we did a not often used technique from Technique Junkies and was ment to be done with buttons instead of the butterflies we used. You can use this technique with different kind of embellishments if they are high enough. 

Tonight we used the butterflies and designer paper from the Sale-a-Bration 2019. Three cards with the same technique but different to see. 

For the first two cards die cut frames by using two seizes of framelits at ones with the Bighot. We made several in different colours and kept the insides as labels for later on. Lay the frames in different seizes on your card in your composition and glue them. Make a foil sheet frame to let this one stand out. Cut out a background for the foil frame 1 millimeter smaller than the outside from the frame. Glue it to the back of your foil frame with the foam strips. Fill it up with butterflies and flowers and glue them. Card 1 done, time for card 2. 
Kaart 2/card 2

For card 2 we use the frames made earlier on and pick two in the same colour and one label in the same colour. Make two backgrounds from the designer paper for the two frames 1 millimeter smaller than the outline of the frames. Glue them with foam strips to the frames and use butterflies to fill them. Not to much because you want to see the background also. Make your composition with the two filled frames and label on your card and glue the two frames. Stamp a sentiment on your label before you glue it on your card. I didn't because I don't know for what occasion I want to use it. I glued another butterfly and flower outside the frames but in essence your card is done. So time for card 3.

For card 3 we take a front that is half a centimeter smaller than the front of your card. We die cut a rectangle out of it to look like a dia or polaroid photo. Use a very thin line of pencil to map out where your frame is on your card so we can stamp the background. Stamp the background not to close to the edge of the card, otherwise it will de visible on the edge. Stamp your sentiment on the frame because when it's glued, stamping on it will be difficult. Put the foam strips on the inside edge of the frame and use demensionals to solidify the frame more. Use two of them on top of each other otherwise it won't be as high as the foam strip. glue it on the card and arrange the butterflies and flowers on the inside of your frame. Not so much because you still want to see the background.


Papier: Stampin' Up! Whisper White 3x A5, Botanical Butterfly Designer Series Paper (Sale-a-Bration 2019), Grapefruit Grove & Lovely Lipstick Foil Sheets (Sale-a-Bration 2019) en andere kleuren.
Framelits: Stampin' Up! Rectangle Stitched Framelits Dies
Inkt: Stampin' Up! Pacific Point, Garden Green, Night of Navy,
Stempels: Stampin' Up! Painted Harvest
Embellishments: Stampin' Up! Butterfly Elements (Sale-a-Bration 2019)
Lijm/glue: Stampin' Up! Foam Adhesive Strips, Multipurpose Liquid Glue en Stampin' Dimensionals

Met dank aan/ with a lot of thanks to: Wad Creatief, Technique Junkies

Nieuwe start / New Start

English Below

Hallo allemaal! Hier een nieuwe start. Het is de bedoeling dat ik 2 keer in de week een nieuw blog post. Er is een hoop gebeurd en na mijn probeersel op Facebook ben ik daar niet tevreden over. Ik zal voortaan via Instagram en hier mijn creaties gaan publiceren. 
Voor ik het vergeet, ik gebruik vaak ideeen van anderen. Alle materialen en stempelsets die ik gebruik, zal ik onderaan mijn post vermelden. 

Deze eerste blog ga ik een kaartje laten zien met mijn favoriete techniek, sponzen. Dit zal ik vaak blijven gebruiken. De set In the Meadow heb ik een tijdje geleden aangeschaft, maaar heb nog geen tijd gehad hier wat mee te maken. Doordat ik nu rustig aan moet doen doordat ik mijn knie verdraaid heb, nu dus wel tijd. :D

Eerst de bergen gestempeld met Basic Grey. Deze nog 2 keer op maskertape gestempeld en uitgeknipt. De bergen gemaskerd en de lucht gesponst met Pineapple Punch, Grapefruit Grove, Lovely Lipstick en Blueberry Bushel. De bergen ingekleurd met grijs kleurpotlood. Het gras op de voorgrond gesponst met Garden Green en Mossy Meadow. De bomen en het gras met Mossy Meadow gestempeld. De hertjes met Soft Suede Gestempeld en ook deze met kleurpotlood ingekleurd. 

Het was weer even wennen om met Blogger te werken. Iedereen bedankt voor het lezen en ik hoop dat jullie mijn blogs gaan volgen.


Hello Everybody! I'm starting fresh with my goal to blog twice a week. A lot has happened and I tried to work with Facebook but that wasn't a succes. I will post my new creations meanly on Instagram and here.

Before I forget, I use a lot of ideas from others. Below my post I will blog the materials used.

For this first blog I will show you a card with my favorite technic sponging. I will use this often. I bought the set In the Meadow a while ago and didn´t have time to use it jet. Because I turned my knee wrong, I´m supposed te keep rest so time to stamp! :D

First I stamped the mountains with Basic Grey and masked them to sponge the sky with Pineapple Punch, Grapefruit Grove, Lovely Lipstick and Blueberry Bushel. I coloured the mountains with grey pencil and sponged the gras with Garden Green and Mossy Meadow. The trees and the gras are stamped with Mossy Meadow. I stamped the deers with Soft Suede and coloured them with pencils.

I'm trying to get used to Blogger again. Thank you all for reading and I hope you all will start following me again.


Papier/paper: rest paper
Stempelset/stamp set: Stampin'Up! In the Meadow
Inkt/ink: Stampin' Up! Mossy Meadow, Garden Green, Soft Suede, In Colors 2018-2020


zondag 29 juni 2014

Verjaardag fotolijst / Birthday Photoframe

Voor de afwisseling een keer naar een verjaardag ver weg geweest. Een vriendin vierde haar verjaardag maar ze woont tegen de Duitse grens aan. Voor het eerst zelf zo'n eind gereden met de auto. Je komt alleen niet met lege handen aan, dus een dubbel fotolijstje gemaakt. Dat was erg leuk om te doen. Allen had ik nog geen tijd gehad om er leuke foto's al in te stoppen.


We did go to a birthday far away. A friend celebrated her birthday but she lives near the German border. It was the first time I drove the car this far on my own. Arriving with nothing is a little bit awkward, so I made her a double photoframe. It was fun to do. Sadly I had no time left to put in some photo's already.


Paper: SU Fresh Prints DSP stack, SU Real Red, SU Whisper white, karton
Ink: SU baked brown sugar and real red
Stamps:SU Feel Goods and Around the World
Framelits: SU On Film

vrijdag 27 juni 2014

Bruiloft / Wedding

Voor het eerst aan de slag geweest voor een bruiloft. Wat ga je maken. Een boekje was het antwoord. Afgelopen regional in Houten hadden ze een hele leuke laten zien met een nieuwe framelit. Het is erg leuk om te maken en het resultaat is flitsend.

Eerst het cardstock op maat snijden en dan met de filetab framelit de tabs aan de zijkant maken. Rillen en beplakken naar wens. De labels maken en daar lint aan knopen. De tabs bestempelen en met lint het boekje dichtvouwen.

For the first time I made something for a wedding. What am I gone make? A small book was the answer. Last regional in Houten the had a very good example with the new framelit. It was fun to make and the result is good.

First cut the cardstock to the right size. Than use the filetab to make the tabs on both sides. Rill the scorelines and use differint kind of papers to adorn it.Make the labels and tie the ribbons to it. I stamped the tabs and used a ribbon to tie the minibook closed.

Paper: SU Whisper white, Shimmery White, Pink Pirouette
Ink: SU Cherry Cobbler
Stamps: SU Language of Love and alphabet stamps (unknown)
Overig: SU Crochet trim lace, Scallop Tag punch, File Tab framelits, Window Frames framelits and pink ribbon (Action)

woensdag 25 juni 2014

Verjaardagsboekje / Birthday present

In korte tijd een kraamcadeau en een verjaardagscadeautje maken. Een boekje dat is het! Alleen dan naar eigen smaak. Voor de verjaardag heb ik een boekje gemaakt waar zelf dingen in geschreven kunnen worden.

Eerst de kaft gemaakt met boekbindtechniek. Gaten in gemaakt en het binnenwerk ook gaten in gemaakt. Bindringen er door en klaar is mijn boekje.

In a very short time I needed a birth present and a birthday present. A book it is. Only in my own style. For the birthday I mode this book where she could write down her own things.

First I made the outside with a bookbinding technic. I made the holes for the rings and than put the rings through. Finished is my book.

Paper: grijsboard, designpaper onbekent, wit papier
Inkt: SU Baked Brown Sugar, Cherry Cobbler, Smokey Slate, Crumb Cake
Stamps: SU Of the Grid, Gorgeous Grunge and One in a Million
Overig: bindringen, SU Crochet trim lace


dinsdag 24 juni 2014

Houten 14 juni 2014 Stampin' Up! Regional

Voor de regional in Houten was het de bedoeling een swap te maken. Dat heb ik gedaan en voor deze keer heb ik iets gemaakt wat heel dicht bij mij ligt. De stempelset gebruikte ik zelden en gaat er ook uit. Dit vind ik heel jammer.

Voor deze swap mocht je alleen spullen van Stampin' Up! gebruiken die gangbaar waren op dat moment.

Als achtergrond heb ik met dezelfde kleur inkt als cardstock gestempeld. Vellum in stroken gesneden en banners van gemaakt. De tekst gestempeld en heeeeeeeel lang laten drogen. De banners op de achtergrond geplakt en daar een glimmer weer op. De benodigdheden en mijn gegevens op een briefje achterop geplakt. Klaar is mijn swap.

For the regional in Houten I made this swap. I made something that is very close to me. The stampset I used was seldom picked by me and is retiring. I regret that. 

For this swap I could only use current Stampin' Up! materials.

As a background I used the same colour ink as the cardstock to stamp with. I cut vellum in strips ans made banners out of that. I stmaped the text on the vellum and that needed a very long time to dry. I glued the banners on the background and glued the supply list and mij contactinfo on a paper on the back.


Paper: Midnight Muse, vellum
Ink: Midnight muse, gold
Stamps: World Map, Cuddles and kisses
Overig: Sticky strip, Rhinestone Basic juwels

vrijdag 11 april 2014

4 April Houten

Voor de Creative tour van Stampin' Up hebben we natuurlijk ook SWAPS nodig. Dus ik maar weer aan de bedenk en ik heb het al vroeg klaar! Het is nu 7 maart en het is af. Nu kan ik aan de verjaardagsslinger voor de jongste beginnen....

De auto geembost op zwart papier. Deze uit geknipt en dimensionals onder gedaan. Papier gesneden voor de tags. Met de tag topper punch er een tag van gemaakt. Het sentiment gestempeld en de auto er onder geplakt. Daarna het grind achter de auto gestempeld.

For the Creative Tour from Stampin' Up I needed SWAPS of course. So I had to think and I'm finished very early. It's the 7th of March and I'm ready! So now I can start on the birthday banner for my youngest.....

I embossed the car on black cardstock and cut them out. Did already som dimensionals underneath them. Cut the paper to create the tags with the tag topper punch. Stamped the sentiments and glued the cars on the tags. Than I stamped the grid behind the cars.

Ik heb alleen Stampin' Up materialen gebruikt voor deze tag. / I used only Stampin' Up materials for this tag.

Paper: Basic black, soho subway designer series paper
Ink: Versamark, basic grey
Embossing powder: Basic black and cherry cobbler
Stamps: Rev up the Fun
Punch: Tag topper punch

maandag 24 maart 2014

ColourQ challenge #233

Weer een kleuren challenge. Deze vind ik altijd erg leuk om te doen. Dit keer wist ik gelijk wat ik ging maken. Helaas heb ik geen going gray en heb ik daarvoor in de plaats smokey slate gebruikt.

Een centimeter van de zijkant een heel dun hulplijntje getrokken. Met behulp van de stamp-a-magic de ornamenten gestempeld. Het sentiment gestempeld en de pareltjes geplakt.

Again a colour challenge. I like them a lot. This time I knew what I wanted to make. Sadly I don't have going grey so I used smokey slate. 


A centimeter from the side I drew a very light supportline. With help from my stamp-a-magic I stamped the ornamens. Than I stamped the sentiment and glued the pearles on.


Paper: from work
Ink: Stampin' Up smokey slate, island indigo, lucky limeade and calypso coral
Stamps: Stampin' Up lovely romance
Pearls: Stampin' Up pearles
Challenge: ColourQ challenge #233

zaterdag 22 maart 2014

Less is More week 164: Recipe

Ik moest echt hoog nodig weer een kaartje maken. Ik heb het zo druk dit weekend. Verjaardag vieren van mijn jongste. Hij is 4 jaar geworden. Dan maar een snel kaartje. Ik heb het al eerder ergens gezien maar nog niet zelf gebruikt.

Vlinders stempelen en daar sentiment naast stempelen. Kleine vlinder op apart cardstock gestempeld en deze uit geponst. Op de grotere vlinders geplakt en kleine pareltjes er op.

I needed to make a card. My weekend is so busy this time. Celebrating my youngest fourth birthday. So here's a quick card. I've seen something like this before but never used it myself.

Stamping butterflies and the sentiment on the card. Stamping smaller butterflies on different cardstock and punched them. Glued the small ones in the card put some small pearls on them. 

Paper: Action and from work
Ink: Stampin' Up rich razzelberry and primrose petals
Stamps: Stampin' Up one in a million and best of 25 years butterflies
Pearls: Stampin' Up pearls
Challenge: Less is More week 164: Recipe

dinsdag 18 maart 2014

Snel kaartje / quick card

Hier nog maar weer even wat bloggen. Ik heb het op het moment heel druk met aan markt voorbereiden, en er is nog wat heel leuks op komst. Maar dat heeft voorbereiding nodig.

Stampin' Up heeft tegenwoordig ook kits. Deze zijn ideaal om snel een kaartje te maken. Ik vind het dan altijd wel leuk om er dan ook dingen bij te gebruiken die er niet in zitten.

So here's a quick blog. I'm very busy at the moment with organizing a fair and something else what is so cool to do. But both projects need time to prepare. 

Stampin' Up has nowedays also kits. Those are ideal to make a quick card. I like to use the kit and than use some other things that aren't in the kit. 

Paper: Stampin' Up kit and whisper white
Ink: Stampin' Up island indigo
Stamps: Stampin' Up Dutch sentiments, petite petals
Punch & dies: Stampin' Up petite petals punch and bitty banners framelits

zaterdag 15 maart 2014

Workshops 15 maart

Voor de workshop had ik 2 dingen voorbereid. Helaas ging het niet door, maar wilde ik toch wat bloggen. De workshop wordt verplaatst. Het eerste was een houten kistje bekleden met papier. Dat kun je heel snel doen moet designpapier en is heel erg leuk. Het is alleen wel een groot project en weinig ruimte om daarna nog wat extra's te doen. Maar een extra kaart heb ik in ieder geval wel voorbereid. Of we er aan toe komen, is een tweede.


For my workshop I prepared two things. Sadly it was cancelled because of en emergency but I still wanted to blog something. We will postpone the workshop to another date. The first was a wooden box with paper coating. You can do that very fast with design paper and fun to do. It's a big project and leaves little time left to do anything else. But I preparde an extra card anyway. If we make it, that's up to the time we have left after the box.

Wooden box:
Paper: Stampin' Up watercolor wonder desinger paper, island indigo, garden green and whisper white
Ink: Stampin' Up cajun craze, island indigo, rangerino tango
Stamps: Stampin' Up label love, 
Punch: Stampin' Up scallop tag topper punch, label love, bird builder punch and 7/8" scallop punch
Die: Stampin' Up rose BigZ
Embossing folder: Stampin' Up scallops


Kaart / Card

Als tweede had ik nog een simpele kaart voorbereid.

As second project I had a card ready.


Paper: Stampin' Up midnight muse, garden green, whisper white and water colour wonder DSP
Ink: Stampin' Up whisper white, in colors 2013-2015
Stamps:Stampin' Up flowershop, petite petals and lots of thanks
Brats: Stampin' Up builder brats,
Punch: Stampin' Up flowershop, petite petals and bird builder punch

donderdag 13 maart 2014

Auto / Car

Ik moest nog een verjaardagskaart maken. Ik had nog een auto gestempeld nog liggen. Destijds wist ik niet wat ik er mee moest doen. Een poos geleden heb ik dit ook al een keer gedaan. Maar dan met een pin up girl.

Het papier op maat gesneden. De onderrand van het venster los gesneden en het papier naar boven toe gescheurd zodat ik het kon oprollen. Met twine vast gezet en het sentiment gestempeld. Deze vastgezet met een paperclip voor de verandering.

I had to make a birthday card. In my leftovers I had a stamped car and at the time I didn't know what to do with it. A while ago I did this already but with a different image.

I cut the paper to the right size. I made a cut below the stamped car and teared it upwarts do make a window. I rolled the paper upwarts and tied it with twine. Stamped the sentiment and fastened it with a paperclip for a change.


Paper: old cartoon and from work
Ink: Stampin' Up basic grey, real red and smokey slate
Stamps: Stampin' Up rev up the fun, gorgeous grunge and self made with Undefined
Twine: Stampin' Up bakers twine island indigo
Paperclip: Stampin' Up essentials hardware clips

woensdag 12 maart 2014

Colour Q #232 & CASology week 86: Roots

Deze keer weer 2 challenges gebruikt. Colour Q vind ik altijd een uitdaging en leuk om te doen. CASology heeft nu een challenge waar ik op het moment veel mee bezig ben. CASology heeft nu het onderwerp Roots. Ik ben geadopteerd en op het moment heel veel bezig met waar ik vandaan kom. Dus roots sluit daar goed op aan. Hier heb ik even over moeten denk. Wat wil ik weergeven van mijn roots? Hoe beeld ik dat goed uit op een kaart met de kleuren van Colour Q? Mijn resultaat: een Zuid-Koreaanse vlag in Colour Q kleuren. Daar liggen mijn roots.


Als eerste de midden Yin en Yang gemaakt. Mal voor het sponzen en de strookjes voor de elementen gesneden. Sentiment gestempeld. Daar staat Daebak wat jackpot beteken en gebruikt wordt als uitroep van blijdschap. Net zoals wij Yes zeggen als er wat lukt. Alles op de kaart geplakt en voila. Kaart klaar.

I used two challenges this time. Colour Q is always a nice challenge for me. CASology has a challene I'm working on at the moment. CASology has the cue card Roots. I'm adopted and I'm busy with my own roots. So it fits perfectly. I had to think carefully about it. What do I want to show from my roots? How do I put that on a card with the colours from Colour Q? My result: the South Korean flag in the Colour Q colours. That's where my roots are.

First I made the Yin and Yang sign. Made a mask to sponge the halves. Then I cut the striks for the elements. Stamped the sentiment. Translation: Daebak witch means jackpot and is used as exclamation of joy. Glued everything on the card and voila. Finished.


Paper: from work and Stampin' Up craft and modern medley
Ink: Stampin' Up lucky limeade and basic black
Stamp: Stampin' Up self made from Undefined
Challenges: Colour Q #282 and CASology week 86: Roots

dinsdag 11 maart 2014

Paper Players #186

This weeks challenge
Onverwachts moest er een beterschap kaartje gemaakt worden voor een meisje en ik moest nog wat maken voor deze challenge. De combinatie was leuk en het is een echt meisjes kaartje geworden met de strass steentjes.

Eerst de achtergrond gestempeld met behulp van de stamp-a-magic. Deze is echt onmisbaar als stempelaar. De tag en kameleon gestempeld. Tag met de BigShot uit gestanst en de kameleon uit geknipt. Tag en kameleon opgeplakt en de strass steentjes opgeplakt.

Unexpectedly I needed to make a get well soon card for a girl and for htis challenge. The combination was fun to do and it became a real girlish cardwith strass.

First I stamped the background with help from my stamp-a-magic. It's indispencable to have as a stampaholic. Than I stamped the tag and the chameleon. I cut the tag with help from my BigShot and the chameleon I cut it out with scissors. Glued the tag and the chameleon on the card and glued the strass on. 

Paper: from work
Ink: Stampin' Up smokey slate, marina mist and crushed curry
Stamps: Stampin' Up lovely romance, tag it (this years Ronald Mc Donalds set)
Strass: Stampin' Up
Challenge: Paper Players #186

maandag 10 maart 2014

Tag Swap februari 2014

Mijn tag
Ik heb meegedaan aan een tag swap. Erg leuk om te doen en dat ga ik zeker vaker doen.

Eerst het papier op maat gesneden. De tag top met de punch gemaakt en het papier geembost. De chevrons uit geponst en de bloem gestempeld. Na dat de bloemen droog waren, deze ingekleurd en uitgeknipt. De chevrons en de bloemen opgeplakt en de sentimenten gestempeld. Deze uit geponst en op geplakt. Lintje er aan en klaar.

De laatste foto is van de swaps die ik kreeg. Dank iedereen voor de mooie tags!

I joined a tag swap. It was fun to do and I will certainly join more swaps.

First I cut the paper to the right size. Than with the tag topper punch I punched the tag top. Embossed the paper and punched the chevrons. Stamped the flowers en coloured those when they where dry. Cut them out and glued them on the tag with the chevrons. Stamped the sentiments and punched them out. Glued the sentiments on the tags and at last put the ribbon on it. 


Tha last picture is from teh tags I got back. Thanks everyone for the beautiful tags!

Tags van swap
Paper: Stampin'Up this and that designer series paper, daffodil delight, aquarel paper, whisper white
Ink: Stampin'Up daffodil delight, real red, garden green and Stazon jet black
Stamp: Stampin' Up blessed Easter, so very grateful
Punch: Stampin' Up tag topper punch, chevron border punch, modern label
Dies and embossing: Stampin' Up bitty banners and arrow embossing folder


zondag 9 maart 2014

Less is More week 162: One layer

Weinig tijd!!! Vandaag verjaardag gevierd en daar langer gebleven dan was voorzien. Daarin tegen was het echt heel gezellig. De kinderen hebben ook genoten. Dus na het eten de jongste naar bed gebracht en nog tijd en creativiteit benutten om een kaart te maken voor de challenge van deze week. One layer en bloemen. Tijd om mijn nieuwste set bloemen te gebruiken!

De bloemen gestempeld en laten drogen. Het sentiment als rand gestempeld en de bloemen in gekleurd. Klaar is mijn kaart. Vrolijk en toch one layer.


To little time!!! Today we celebrated my fathers birthday and stayed longer than planned. But the mood was so good. The kids enjoyed it too. So after diner I brought the youngest to bed and than I had some time to use my creativity to make a card for this challenge. One layer and flowers. Time to use my newest set of flowers!


Stamped the flowers en let them dry. Stamped the sentiment as a border and coloured the flowers. Finished is my card. Happy and still one layer. 

Paper: from work
Ink: Stampin' Up basic black and real red
Stamps: Stampin' Up so very grateful
Pensels to colour the flowers.
Challenge: Less is More week 162: One Layer

zaterdag 8 maart 2014

Sneak Peeks

Deze keer geen nieuwe maaksels maar sneak peeks voor wat er gaat komen. Morgen ga ik wel weer iets nieuws laten zien.
SWAP

De eerste is een klein kijkje voor wat ik als swap ga geven. Een swap is een klein project wat snel gemaakt is en weinig materiaal verbruikt. Het is vooral bedoelt om de krijger een nieuw idee te geven om te maken. De swap in zijn geheel zal 6 april op mijn blog staan!

Tweede wat ik wilde laten zien is wat ik ga maken met een workshop op 15 maart.

Workshop 15 maart

Als derde en laatste wil ik jullie een klein stukje laten zien van wat ik voor de hostess in petto heb. De laatste twee zal ik volledig laten zien op mijn blog van 16 maart.

Hostess gift
This time no new things but sneak peeks for what's coming. Tomorrow I will show you a new project.

The first is a small peek for what I'm going to give away as a swap. A swap is a very small project that uses very little materials. It's used to give the reciver a new idea for something to make. I will show you the whole swap at Apitl 6th.


The second sneak peek is what we're gone make at a workshop on March 15.

Third and last I want to show you a small peak at what I made for the hostess. The last two I will blog om March 16th.

vrijdag 7 maart 2014

Drieluik / Triptych

Poging 2 / second try
Het leek mij zo leuk om van deze stempel een drieluik te maken op een kaart. Dat is me dan nu gelukt. Dit is het resultaat van poging 4.

Een dag van te voren al de bloemen gestempeld met stazon op aquarelpapier. Deze ingekleurd met aquarelpotloden en waterpen. Cardstock voor een deel tussen de embossing folder gestopt zodat maar een deel geembost wordt. De bloemen op maat gesneden en daarna in drieën gesneden. Sentiment gestempelt en uit geponst. Alles op de kaart geplakt.

Eindresultaat / end result


I wanted to try a triptych with this stamp so badly. I finaly did it. This is the result of my fourth try.

One day ahead I stamped the flowers in stazon on aquarel paper. Coloured the flowers with aqarel pensels and a waterpen. Embossed the cardstock for a part by puting not the whole cardstock in the embossing folder. Cut the flowers to the right size and cut them in three. Stamped the sentiment and punched that out. Glued everything on the cardstock.

Paper: Stampin' Up aquarel paper, rich razzleberry
Ink: Stmapin' Up stazon, rich razzleberry
Embossing folder: Stampin' Up decorative dots
Punch: Stampin' Up word window
Pensels: Bruynzeel aquarel
Stamps: Stampin' Up so grateful and Dutch sentiments